Compress BMP Files: 3 Proven Ways to Shrink Them Fast
جدول المحتويات
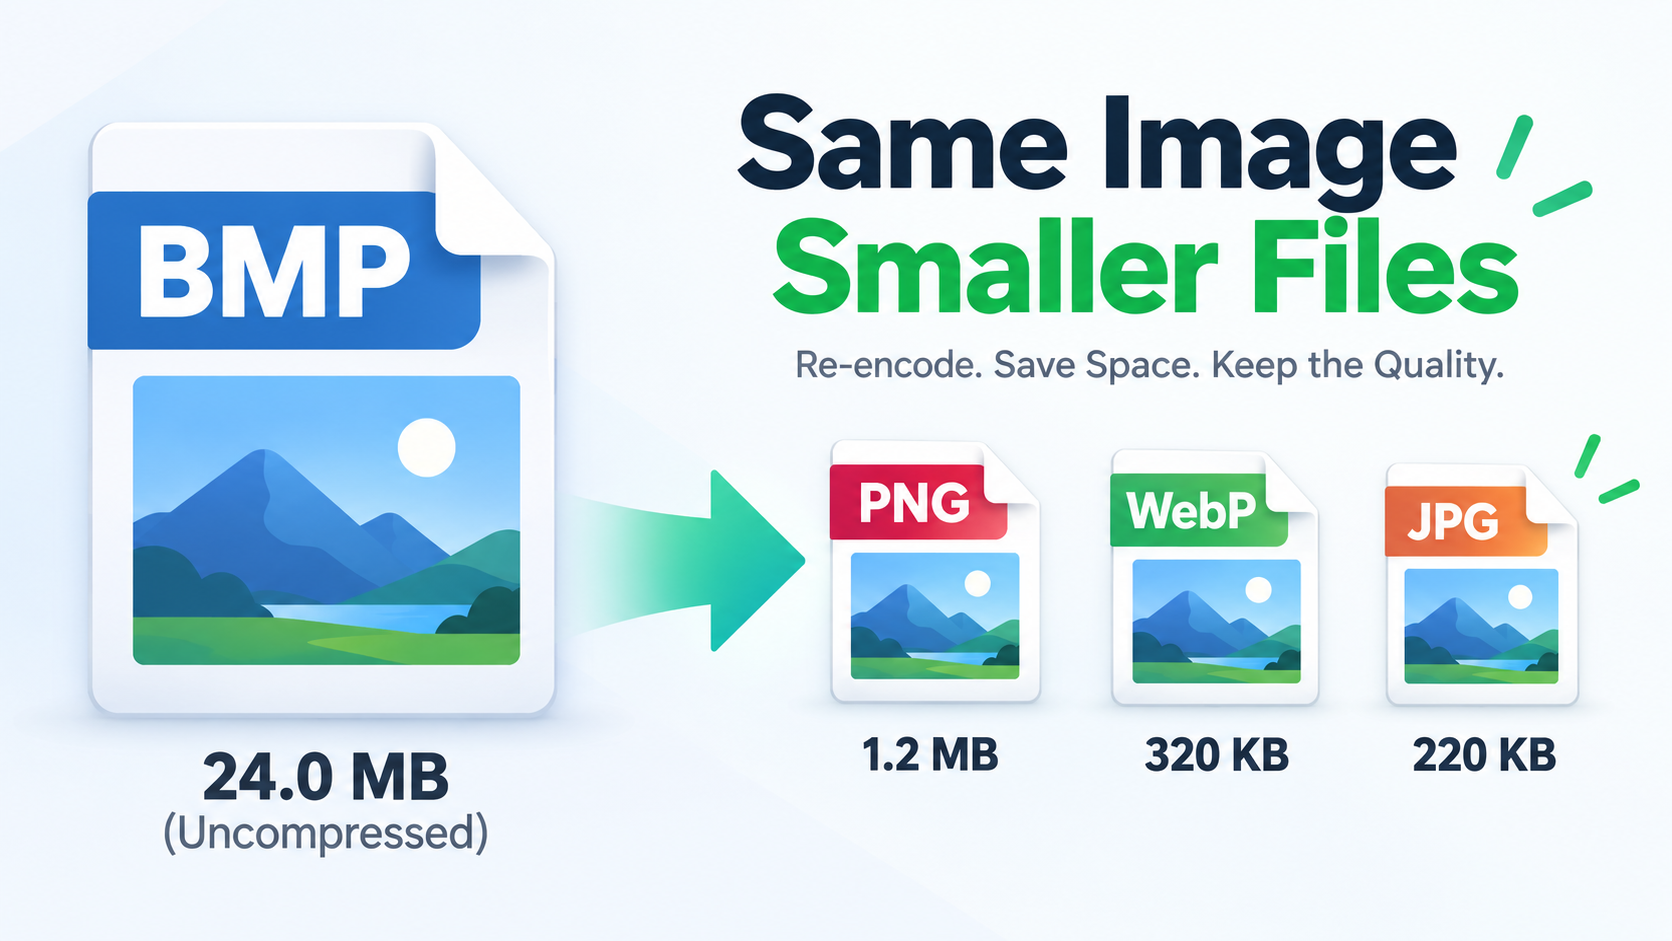
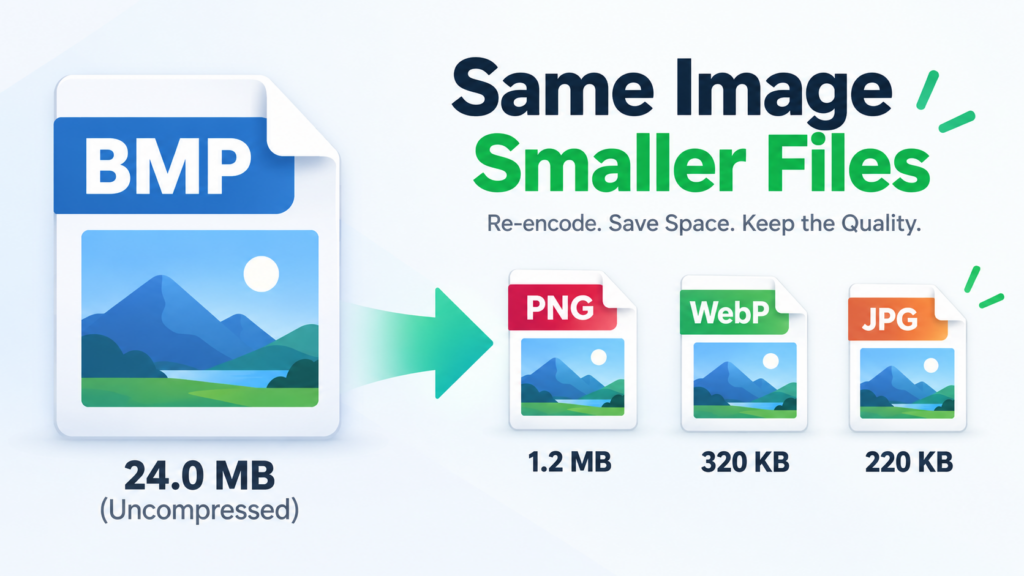
BMP stores every pixel uncompressed, so you can’t compress BMP much while keeping the .bmp extension. The practical fix is to re-encode as PNG or WebP for lossless savings, or JPG for photos — usually cutting file size by more than half.
How to Compress a BMP File: The Three Paths That Actually Work
Before you open a tool, know that “compress BMP” isn’t a single operation. There are three real paths, and only one of them keeps the .bmp extension. Pick the wrong one, and you can spend an hour dragging sliders only to end up with a file that’s barely smaller.
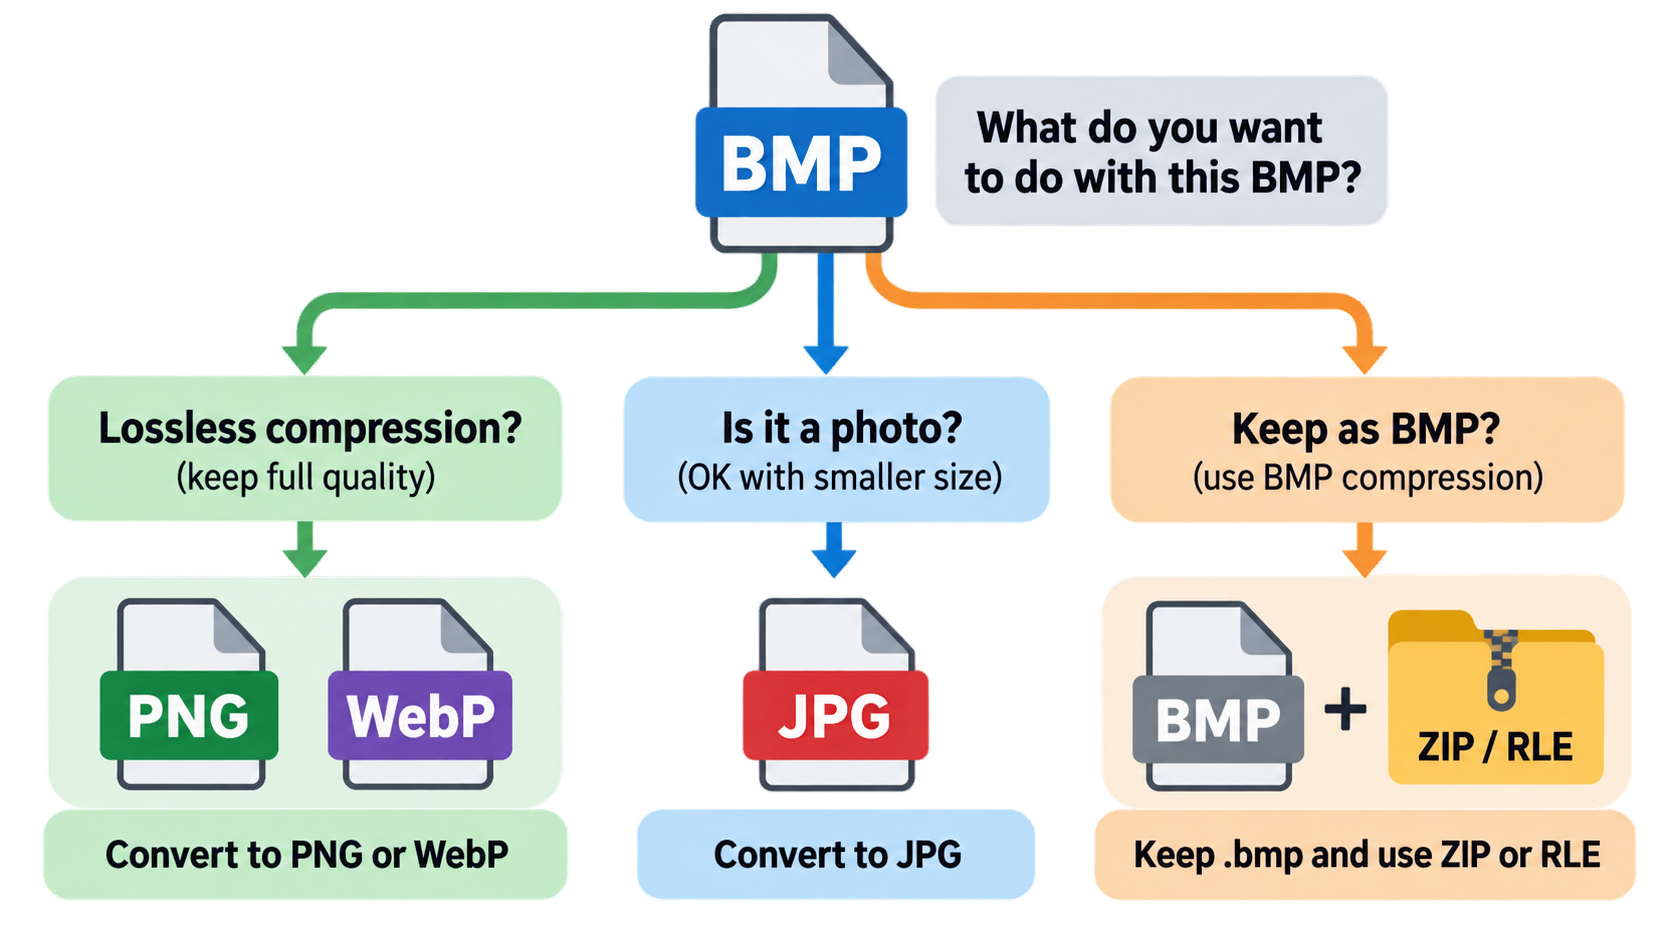
Path A — re-encode to PNG or WebP. This is lossless re-encoding. Every pixel you get back matches the one that went in, but the file is usually 60–80% smaller. Why? The encoder removes redundancy BMP never bothered to remove. It’s the best fit for screenshots, line art, logos, and CAD or GIS exports.
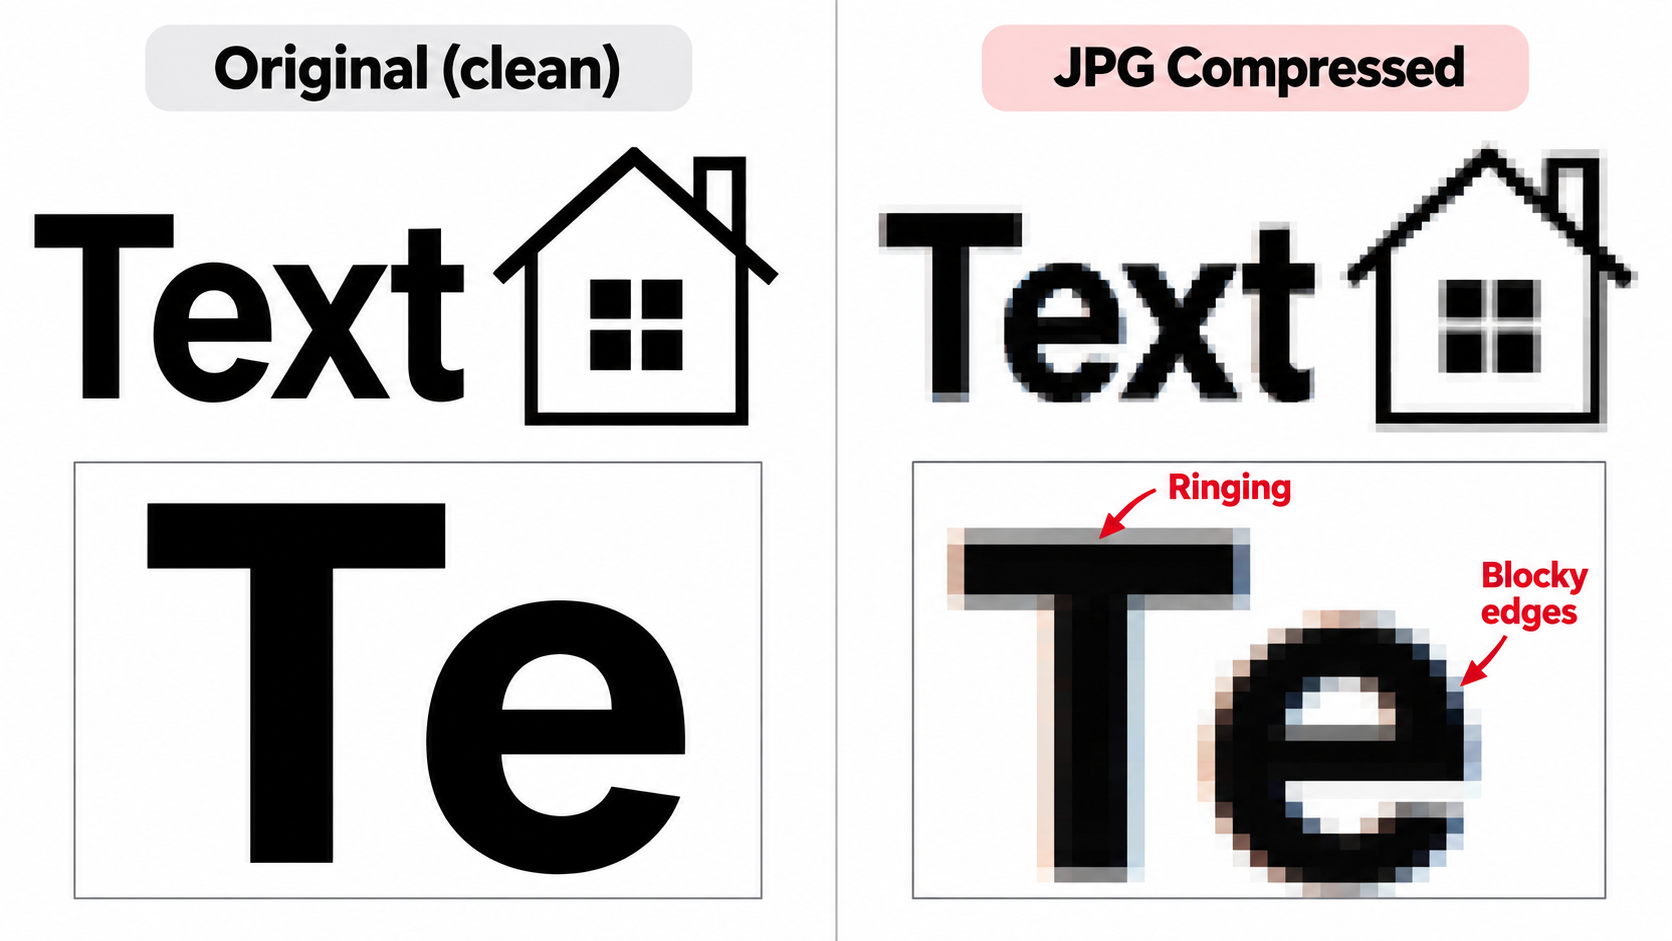
Path B — re-encode to JPG. This is lossy, and it gives you the smallest file for photographs. It also adds visible ringing and blocking around text and hard edges, which is why it’s a poor choice for anything that looks like a diagram.
Path C — keep the .bmp extension. ZIP or Deflate archiving, RLE encoding, or reducing bit depth and DPI. These are real, working options, but the savings are modest compared with a format change.
The one-line decision shortcut: photograph → JPG or WebP; screenshot, line art, or scan → PNG; web page asset → WebP; must stay .bmp → ZIP or RLE.
Path A: Re-encode to PNG or WebP (Lossless)
PNG is the default lossless target. It applies Deflate compression to the raw pixel data, and according to CoolUtils, that cuts BMP file size by 60–80% with no quality difference. WebP offers a lossless mode that generally goes smaller still, and it is supported by every current major browser.
Because nothing is discarded, this path is safe for images where accuracy matters: screenshots of application UIs, scanned pages that need to stay legible, monochrome technical drawings, and exported maps. You can verify the result by opening both files side by side at 100% zoom — they should be indistinguishable.
Path B: Re-encode to JPG (Smallest, Photos Only)
JPG wins on raw byte count for photographs, where smooth gradients and fine noise tolerate lossy compression well. The trade-off is real but localized. Compression artifacts appear first around sharp transitions, which is precisely where text, table borders, and thin vector-like lines live.
Use JPG for camera output and continuous-tone imagery. Do not use it for screenshots of documents, terminal windows, or CAD drawings — the text becomes fuzzy at exactly the zoom level people use to read it.
Path C: Keep the .bmp Extension (Limited but Possible)
Some pipelines cannot accept PNG. Legacy Windows software, industrial control panels, and older medical imaging systems expect raw bitmap data, and swapping the extension breaks the workflow. In that case your options are general-purpose lossless archiving, BMP’s own RLE encoding for indexed images, or reducing the bit depth or pixel dimensions. Each works; none gets you close to what PNG would deliver. The next section covers each in detail.
Why BMP Files Are So Large: The Windows Bitmap and Its Uncompressed Pixels
BMP is one of the oldest image formats on the IBM PC. According to Wikipedia, the format was first released by Microsoft in December 1987, and the modern file structure most applications write today arrived with Windows 3.0 in 1990. Its history is visible in the header sizes: the 12-byte BITMAPCOREHEADER was the original, the 40-byte BITMAPINFOHEADER came with Windows 3.0 in 1990, the 108-byte BITMAPV4HEADER arrived with Windows 95 and NT 4.0, and the 124-byte BITMAPV5HEADER came with Windows 98 and Windows 2000.
The reason for the size problem sits in the pixel format, not the header. BMP defaults to BI_RGB, meaning every pixel is stored literally on disk. There is no entropy-coding step, no dictionary, no prediction — nothing that looks at the image as a whole and removes repetition. The bytes on disk are essentially a dump of the frame buffer.
This reframes the entire task: “compressing” a BMP is really a re-encoding decision. It is not a quality slider you drag until the number gets small enough.
The Pixel Array, Row Padding, and the Size Formula
For an uncompressed bitmap, the pixel array is written as successive scan lines, each rounded up to a multiple of 4 bytes — the padding is called the stride, and the pad bytes are not necessarily zero. Total pixel data lands at roughly width × height × bytes-per-pixel, plus padding overhead. Color tables, when present for indexed images, add a small fixed amount.
That formula is also the diagnostic. If a file is unexpectedly huge, either the pixel dimensions are large, the bit depth is 24 or 32, or both. There is nothing hidden to blame.
Bit Depth and DPI: Why a 300 DPI Scan Hits 25 MB
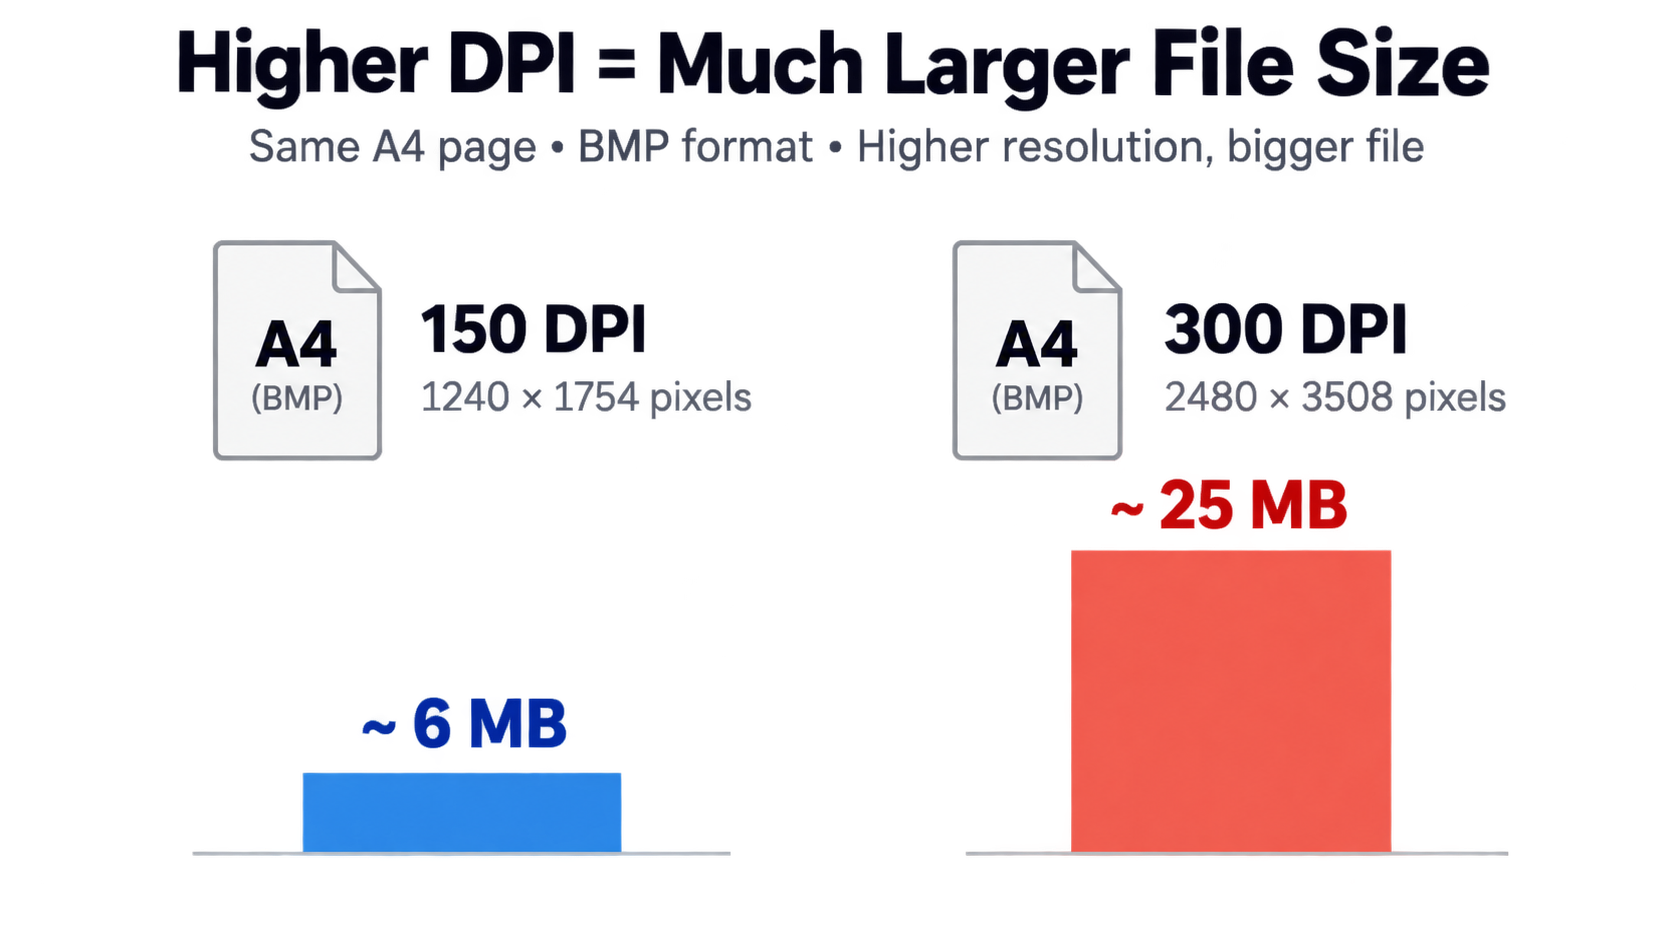
Size scales with both bit depth and resolution, and print-oriented scans push both up at once. CoolUtils puts a single A4 page rendered at 150 DPI (1240 × 1754 pixels, 24-bit color) at roughly 6 MB as a BMP. The same page at 300 DPI reaches about 25 MB.
A 300 DPI A4 page is 2480 × 3508 pixels — four times the pixel count of the 150 DPI version — and at 24 bits per pixel that multiplication lands directly on the file size. This is why scanned documents and PDF-to-BMP exports produce files that resist email attachment limits.
Compressing a BMP Without Changing the Format
This is the question most tool pages skip: sometimes the extension simply cannot change. Legacy Windows applications such as Paint, older medical imaging software, and industrial control panels expect raw bitmap data rather than a compressed image, and a PNG renamed to .bmp will not load. If you are in that situation, four options remain.
Option 1 — general-purpose lossless archiving. Wikipedia notes that because uncompressed BMP files hold a great deal of redundant data, they can often be reduced substantially by general-purpose lossless compression such as ZIP or RAR. Nothing about the image changes; you simply wrap it in a container that removes the repetition. The downside is that the recipient must decompress before opening.
Option 2 — BMP’s own RLE encoding. BI_RLE4 and BI_RLE8 are run-length encoding modes defined in the format itself. They are limited to 4-bit and 8-bit indexed-color images, which excludes most contemporary content.
Option 3 — reduce bit depth. Dropping 24-bit true color to an 8-bit indexed palette cuts pixel data by roughly two-thirds. It only works cleanly when the image genuinely uses few distinct colors — screenshots of text, monochrome line art, simple diagrams.
Option 4 — crop or downsample. Fewer pixels is the only guaranteed byte reduction, but it changes the image dimensions rather than compressing it.
Set expectations honestly: staying inside .bmp caps your achievable savings well below what PNG or WebP would give you on the same file.
ZIP and Deflate: Lossless Shrinking Without Touching a Pixel
ZIP is the safest option because it is fully reversible and requires no format knowledge. The compression ratio depends on how repetitive the pixel data is — a flat white scanned page compresses dramatically better than a photograph, which has high per-pixel entropy. For archival storage of BMPs you cannot convert, ZIP or RAR is the default answer.
RLE Encoding: Only for Indexed 4- and 8-Bit BMPs
Run-length encoding replaces sequences of identical pixel values with a count and a value. It works well on flat regions and poorly on noise. In practice, RLE is a legacy capability rather than a routine choice, and most modern encoders do not offer it as an output option at all.
Lower Bit Depth, Crop, or Downsample
If the BMP only exists to feed a display or a print at a known size, reducing bit depth or DPI is legitimate. Check whether the image is truly 24-bit color or merely a 24-bit container holding a handful of colors — the difference determines whether an 8-bit palette is lossless in practice. Crop first: removing empty margins costs nothing and reduces the pixel count before any other step.
PNG vs JPG vs WebP vs PDF: Which Format Shrinks a BMP the Most?
The best target format depends on what the image contains and where it is going, not on which format has the best reputation.
Decision Table: Pick the Format by Image Type
| Image type | Best target | Why |
|---|---|---|
| Screenshot (UI, dialog, terminal) | PNG | Lossless, keeps text and 1-pixel borders sharp |
| Scanned document page | PNG, or PDF for archiving | Legible text, no artifact buildup |
| Line art, logo, icon | PNG or lossless WebP | Flat colors compress extremely well |
| CAD or GIS export | PNG | Preserves thin lines without ringing |
| Photograph | JPG or lossy WebP | Lossy compression is efficient on continuous tone |
| Web page asset | WebP (AVIF as a next-gen option) | Smaller transfer size, broad browser support |
PNG is the default lossless target and the one with the clearest published numbers: 60–80% smaller than the source BMP with no quality difference, per CoolUtils. WebP usually beats PNG at the same visual quality for web delivery, and AVIF can go smaller still, though support is less universal.
Tie the choice to the delivery target. For web pages, smaller images support faster Largest Contentful Paint and less layout shift in Core Web Vitals. For email, the constraint is an attachment limit. For print archiving, it is fidelity.
Why JPG Ruins Text and Line Art
JPG compresses by discarding high-frequency detail, and text edges are almost pure high-frequency detail. The result is ringing — faint halos around letters — and blocking, where the image breaks into visible 8×8 tiles. On a photograph nobody notices. On a screenshot of a spreadsheet, it makes numbers hard to read.
WebP, AVIF, and PDF for Specific Delivery Targets
WebP compresses further than PNG or JPG for the same visual quality at high resolutions, which is why it has become the default recommendation for modern websites. AVIF is a next-generation format offering strong compression with high quality; it is gaining adoption but is worth verifying on your target platform.
PDF behaves differently from the image formats. It is a container, not a compression codec, and the converter applies Flate or JPEG compression inside the PDF — which CoolUtils says can shrink a file dramatically compared with the raw BMP. That makes PDF a strong choice when the destination is a document to be emailed, printed, or archived rather than an image to be edited. For a sense of magnitude, ResizerPicture demonstrates an 8 MB source photo becoming a 450 KB JPG and then a 220 KB WebP — vendor self-reported figures, useful as an order-of-magnitude reference rather than a promise.
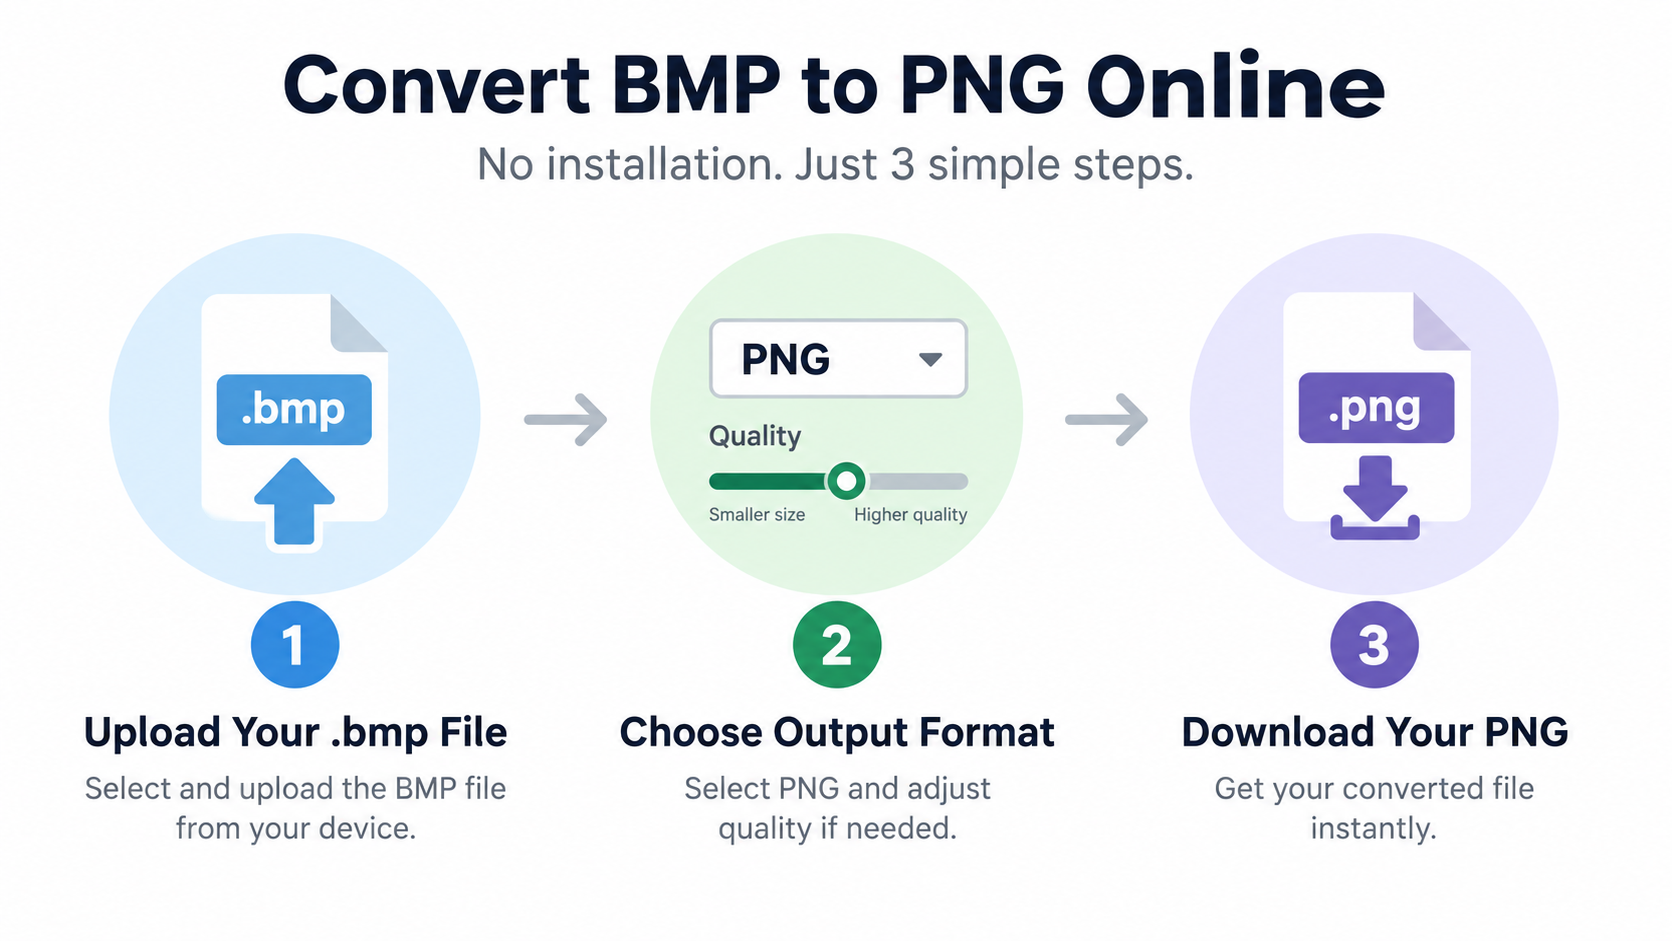
How to Compress a BMP Online in 3 Steps (No Install)
Browser-based converters handle the format change without any software. The process is short enough that the harder decisions are the format and quality settings you pick, not the click sequence.
Step-by-Step: From .bmp Upload to Smaller Download
Step 1: Upload the .bmp. Drop the file into a browser-based BMP compressor. Some tools also accept a URL or a cloud storage import.
Step 2: Choose the output format and quality. Pick PNG for screenshots and line art, JPG or WebP for photographs, or PDF if the goal is a shareable document. If the tool exposes a quality slider, start high and step down.
Step 3: Download the result. Single files download directly. Tools that handle multiple files typically package everything into one ZIP.
Check the free-tier limits before you upload a folder. Aspose’s BMP Resizer allows a maximum of 5 files and 5 MB total per operation on the free tier, while CoolUtils accepts BMP files up to 50 MB. The gap between those two numbers decides which tool is usable for a given job.
The online-versus-desktop trade-off is straightforward: online means no install and immediate use, desktop means higher or unlimited size ceilings, batch power, and full control over encoder settings. For a one-off screenshot, online wins. For a folder of 300 scans, it does not.
How to Tell Whether a Tool Uploads Your File
Look for two specific signals. First, whether the tool states that processing happens locally in your browser. Second, whether it publishes a retention window. Aspose states that documents are stored in secure storage for 24 hours and then deleted; CoolUtils states that both the source and result are deleted automatically after conversion, and in any case within 24 hours.
A tool that says nothing about either is not automatically unsafe, but you have no basis for trusting it with confidential material. For CAD exports, medical scans, or anything under an NDA, use an offline desktop tool or a local script instead.
One more check worth running: verify the tool actually re-encodes rather than merely resizing dimensions. A resizer can shrink the byte count by discarding pixels, which is a different operation with a different result.
Batch-Compressing Dozens or Hundreds of BMP Files
Single-file web converters do not scale. Uploading one file at a time is tolerable for three images and untenable for a folder of 200 scans or a nightly CAD export.
Browser-based batch converters occupy a middle ground. BulkImagePro accepts up to 50 files per run, processes them locally in the browser, and packages the output as a single ZIP that downloads automatically. That ceiling is generous for a design team and irrelevant for a production archive.
Choose by volume: under 20 files, use an online bulk image converter; 20–500 files, use a desktop batch tool; recurring or scheduled jobs, use a script or a watch folder.
Desktop Batch Converters and ZIP Output
Desktop tools remove the file-count ceiling and typically preserve folder structure, which matters when you are converting a directory tree rather than a flat list. reaConverter converts hundreds of BMP images at once, works entirely offline so nothing is uploaded, integrates with the Windows right-click menu, and supports Watch Folders for automated runs. Because there is no upload, the privacy question disappears entirely.
Scripted Pipelines and Watch-Folder Automation
For repeatable, version-controlled pipelines, command-line conversion is the most reliable option. reaConverter exposes all of its features from the Windows command line, and CoolUtils documents a command-line form for batch BMP-to-PDF work, with a /ProcessRecursively switch to include subfolders. Wrap the command in a batch file and schedule it.
Watch Folder mode is the natural end state for recurring jobs: set the rules once, and every new BMP that lands in a directory is converted and filed automatically. That removes the manual step from the workflow entirely.
Compression vs. Resizing: Hitting a Target File Size Without Losing Quality
The distinction matters more than it sounds, because many tools labeled “compress BMP” only resize. Aspose’s BMP Resizer is explicit that it resizes — increasing or decreasing image dimensions — and does not perform byte-level compression. If a tool only scales pixels, it will never shrink a BMP at fixed dimensions, regardless of its label.
Compression changes bytes. Resizing changes pixels. When a portal demands a file under 500 KB, you can work backward: choose the format first, then adjust the quality setting or the color depth, and only resize if you still miss the target. Tools that accept an explicit target size do this search for you; a compress BMP to 100 KB tool fixes the ceiling and adjusts quality automatically, and News Appite’s 500 KB compressor lets you enter any target in KB and automatically finds the highest quality that fits, reducing dimensions only when necessary.
Does Compressing a BMP Reduce Image Quality?
It depends entirely on the target format, not on the act of compressing. PNG, lossless WebP, and ZIP archival produce output that is pixel-identical to the original BMP. JPG and lossy WebP discard detail, and the artifacts appear first around text and hard edges. Judge lossy output at 100% zoom over a region containing text, not from a thumbnail.
Stripping EXIF Metadata: Smaller and Safer
Image files routinely carry EXIF metadata such as GPS location, camera model, and timestamps — CoolUtils notes that BMP uploads can carry this information. Removing it is a modest size win and a meaningful privacy win, particularly for photos taken on phones and shared publicly. Several browser-based tool suites include a dedicated EXIF remover alongside their conversion utilities.
Conclusion
You cannot meaningfully compress BMP in place. The format stores raw pixels by design, so the real savings come from re-encoding to PNG, WebP, or JPG, with ZIP or RLE as the only options when the .bmp extension must stay. Pick the target format by image type — PNG for screenshots and line art, JPG for photos, WebP for web pages, PDF for documents you need to archive. Run one file through a converter, compare the before-and-after size and the visual result at full zoom, then scale up to a batch tool or a scripted pipeline for the rest of the folder.
FAQ
Can I compress a BMP file without changing it to another format?
Yes, but only modestly — the BMP specification offers no efficient compression of its own. Your options are ZIP, RAR, or Deflate archiving, RLE encoding for 4- or 8-bit indexed images, or dropping from 24-bit to 8-bit color. Expect far smaller savings than converting to PNG or WebP.
Does compressing a BMP reduce image quality?
It depends on the target format, not on the act of compressing. PNG, lossless WebP, and ZIP are lossless — pixels remain identical to the original BMP. JPG and lossy WebP discard detail, and artifacts show up first around text and hard edges. Always check lossy output at 100% zoom.
How much smaller is a PNG or WebP than the original BMP?
PNG typically cuts BMP file size by 60–80% with no quality difference, according to CoolUtils. WebP generally goes smaller still than PNG for the same image and quality level, especially at high resolutions. Multi-megabyte BMPs from 300 DPI scans can drop by well over 80% when re-encoded.
Why is my BMP file so large in the first place?
BMP stores every pixel literally as width × height × bytes-per-pixel, with row padding, and applies no compression. File size therefore scales directly with resolution and bit depth. A single A4 page is roughly 6 MB at 150 DPI and about 25 MB at 300 DPI as an uncompressed BMP.
Can I batch-compress hundreds of BMP files at once?
Yes. Browser-based batch converters handle about 50 files per run and deliver a ZIP download. Desktop batch tools and command-line scripts scale to thousands of files. For recurring jobs, a Watch Folder or scheduled script converts new BMPs automatically as they arrive, with no manual step.
Is it safe to compress BMP files with a free online tool?
Check two things: whether the file is processed locally in the browser, and what the retention policy says. Reputable tools state either that files never leave your device or a clear auto-delete window such as 24 hours. For confidential scans, CAD exports, or anything under an NDA, use an offline desktop tool or a scripted local pipeline instead.
عن المؤلف
مطور مستقلأنا مطور مستقل أقوم ببناء تطبيقات iOS وتطبيقات الويب، مع التركيز على إنشاء منتجات SaaS عملية. أتخصص في AI SEO، وأستكشف باستمرار كيف يمكن للتقنيات الذكية أن تدفع النمو المستدام والكفاءة.
آخر مراجعة 2 أكتوبر 2026. تتم مراجعة هذه المقالة للدقة وتحديثها عند تغير الأدوات أو سلوك المنصة.